Saturday, May 07, 2011

Cinnamon, spice and all things nice

I love hot cross buns, even the cheap and nasty ones from unnameable supermarkets. Yes, I know it's a deplorable confession from one who pursues all things slow.

But to be honest, I can't help it, and if I was honest, I am sure that I could think of at least another ten foods, where I embrace the culinary ready-made.

Food is an odd thing - its culture, history, sensory, it fills us with nostaglia and longing. That's the beauty of it. So when I surcome, it's because of a yearning for all the memories and sensations, the feeling of comfort that I get from that heavenly, ohh so heavenly combination of cinnamon, dried fruit and butter. The promise of this combination undoes me everytime, leading me to a state of non-discrimination and then disappointment.

So with Easter approaching, I am obsessing about hot cross buns and vow to myself to exercise the same discrimination that I do for every other food type! So here I go, here is a hot cross bun recipe.

Ingredients
325 gm raw caster sugar
1 lemon
1½ Granny Smith apples, unpeeled, cored, diced
1 cinnamon quill
750 gm (5 cups) plain flour - (Iused gluten-free flour)
150 gm sultanas or golden raisins
50 gm dried apple, diced 30 gm
candied orange, diced 14 gm
(2 sachets) dried yeast 3½ tsp
ground cinnamon
½ tsp allspice
Finely grated rind of 1 orange and 1 lemon
380 ml milk
100 gm butter coarsely chopped
1 egg

Preheat your oven to 220C.

Stir together 260gm sugar and 375ml water in a saucepan. Squeeze in the juice of half a lemon and stir over a medium heat until sugar dissolves. (This will be later used to glaze the chopped apple. Trust me, this is worth doing. The smell and taste is lemon fresh but equally warm and cozy.)

While the sugar and water are dissolving, cut the lemon into slices, add the Granny Smith apple and cinnamon quill. Bring to a simmer and then reduce to a medium heat. Cook until the lemon and apple are translucent. In this recipe, this is 20-25 minutes. Strain, reserving fruit and syrup separately. When cool enough dice lemon and combine with the apple.


Now it is time to prepare the dry ingredients -place the flour, sultanas, dried apple, candied orange, yeast, 3 tsp ground cinnamon, allspice, rinds, remaining sugar, reserved apple mixture and 1 tsp salt in a large bowl. The sight of this alone makes it worth doing.


Combine milk and butter in a small saucepan, warm over low heat until butter melts and mixture is lukewarm. Whisk in egg, then add milk mixture to flour, stirring to form a soft dough. Turn onto a lightly floured surface and knead until smooth and elastic.


Place in a lightly buttered bowl, cover and stand in a warm place until doubled in size. This should take 30-40 minutes.

Divide your dough into 20 even pieces, then knead each piece into a smooth ball. Arrange dough balls into two concentric circles on a large round or rectangular baking tray lined with baking paper, leaving 1cm between each for dough to expand.

Cover with a tea towel and stand in a warm place until doubled in size (30-40 minutes).

Combine remaining flour and 70ml cold water in a bowl and stir to a smooth paste. Spoon into a piping bag fitted with a small plain nozzle and pipe a cross shape onto each bun.


Bake for 10 minutes, reduce oven to 200C and bake until golden and buns sound hollow when tapped (8-10 minutes).
Take the reserved syrup and cinnamon and heat in a small saucepan until syrupy. Brush thickly over hot buns, then transfer to a wire rack to cool.


The verdict: What can I say, I don't get gluten free flour. Whatever is not in it makes a huge different to the texture, no vicosity of the dough - is that a word, she asks. The buns were heavy, almost scone like. The taste and smell were wonderful but really... really, she cries. Mr Sloweater can do his own in future.


That's it... I'm returning to the store brought!

This recipe is from the April 2010 issue of Australian Gourmet Traveller.

Sunday, May 01, 2011

Food to live by: Terrine de Campagne

There are very few things that I shy away from in the kitchen. I love the promise of adventure that beckons from empty pans and a full larder.

So when a friend invited us to some house warming drinks, I immediately thought Terrine de Campagne. Rustic, warming with the promise of perfectly chilled champagne, there was no doubt that this was the dish of choice.

It’s a simple dish, uncomplicated despite being made in two stages. The first is the preparation of the ingredients that then sit overnight and the second is the cooking and the eating!

Served with bread, cornichons (those crisp, tart pickles), and some chutney, it’s a perfect dish that lasts up to a week.

Terrine de Campagne is a basic of the French kitchen, as you can see from every charcuterie and market that you visit. Everyone has a different recipe but the fundamentals remain the same – a earthly terrine with a depth of flavour, using local ingredients.

Where to begin
250g sliced bacon
a tablespoon of butter
1 onion, chopped
500g pork minced
250g veal, minced
250g chicken livers, finely chopped
2 cloves garlic, finely chopped
¼ teaspoon ground allspice
A pinch ground cloves
A pinch ground nutmeg
2 small eggs, beaten
2 tablespoons of cognac (the original recipe called for brandy)
salt and pepper to season
bay leaf
sprig of thyme

If you are feeling adventurous you could add pistachio nuts OR just jump right in there and include some preserved truffles. This I had intended to do but forgot! This is despite the fact that I had prepared all the recipes in advance.

Before moving onto the cooking process – the question of the terrine dish needs to be explored.

My desire to make a terrain came from my first visit to E. Dehillerin, that Aladdin’s cave of culinary wonderment, where I found in the basement, cast iron Chasseur dishes. I was sold except there was no way that I could cart home a terrine dish on the Eurostar. I would get one in London at the sales I told myself.

Well of course I didn’t, so when preparing to make this terrain I also looked at purchasing a terrine dish. Ummh, who would have thought they were so (and I mean so so) expensive. Seriously! So I used a cake tin instead – perfectly acceptable, especially when one has a petite kitchen, where space needs to be bartered for!

So let’s get to the cooking.

Preparation
Start by lining your terrine dish (or in my case, a cake tin) with bacon. Make sure that you retain a few slices that will be used to cover the terrain at the end of this first stage.


Melt your tablespoon of butter and cook a finely diced onion, until it is soft. Now mix together the onion with the pork, veal, chicken livers, garlic, allspice, cloves, nutmeg, eggs cognac and salt and pepper.


Now a quick word about my ingredients. The pork and livers came from my favourite butcher. The pork was minced; the livers were not. So be prepared to dice your livers -very roughly. A much less queasy experience that I had imagined. Now the veal proved more troublesome as my butcher does not do veal, presumably for ethnical reasons. I'm not sure; so, I ended up getting veal from Waitrose. Perfectly acceptable.


Spread the mixture into the lined terrine, packing the terrine as you go. Note how the bacon hangs slightly over the edge of the dish. This makes folding easier, as you can see from the next picture. Use the remaining bacon slides to cover the terrine. Then cover with cling wrap and leave overnight in the fridge.


Cooking of the terrine
Set the oven to 180ºC (35OºF).

Now here I departed from my original recipe and turned to Julia Child, that original domestic goodness, who understood that careful instructions are needed for those women without domestic help!

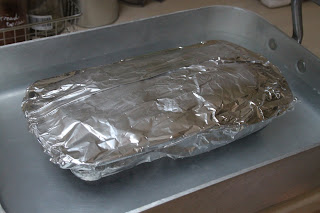
So to cook this is what you need: aluminium foil to cover the terrine, a heavy lid (that I will explain in a moment), and a pan of boiling water.

Cover the terrine dish in aluminium foil and place in a pan of boiling water. The water needs to come half-way up the pan. I used a heavy roasting dish.

Place the terrine in the lower third of the pre-heated oven and bake for 1.5 hours.

Now this is where I got all very nervous and thought I had undercooked the terrine and that I was likely to kill my host and partner! This did not happen. The terrine was absolutely perfect.

Julia recommends that the terrine is done when it has shrunk slightly from the dish. This it did and that the juices were clear. Now this is where I got confused. The side juices were clear but the middle juices were slightly pink.


Post-cooking and checking of juices, remove the terrine from the water and remove the foil. This is the stage, where you need to weigh down the terrain. All very easy: a cake tin, some cans and when it’s completely cool, put it in the fridge.


Now it was my intention to photo the terrine perfectly presented. That didn't happened but I promise you, the terrine was good, exceptionally good.